 Wansview Cloud Docs
W6 User Manual
Wansview Cloud app user manual for the W6 1080P outdoor security camera — setup, live feed, settings, storage, and Alexa.
W6 User Manual
This is the Wansview Cloud App User Manual for the W6 1080P Outdoor Security Camera.
We keep improving the app. If the app interface is not in accordance with the instructions, please go to www.wansview.com for the latest instructions.
Chapter 1 — Camera Introduction
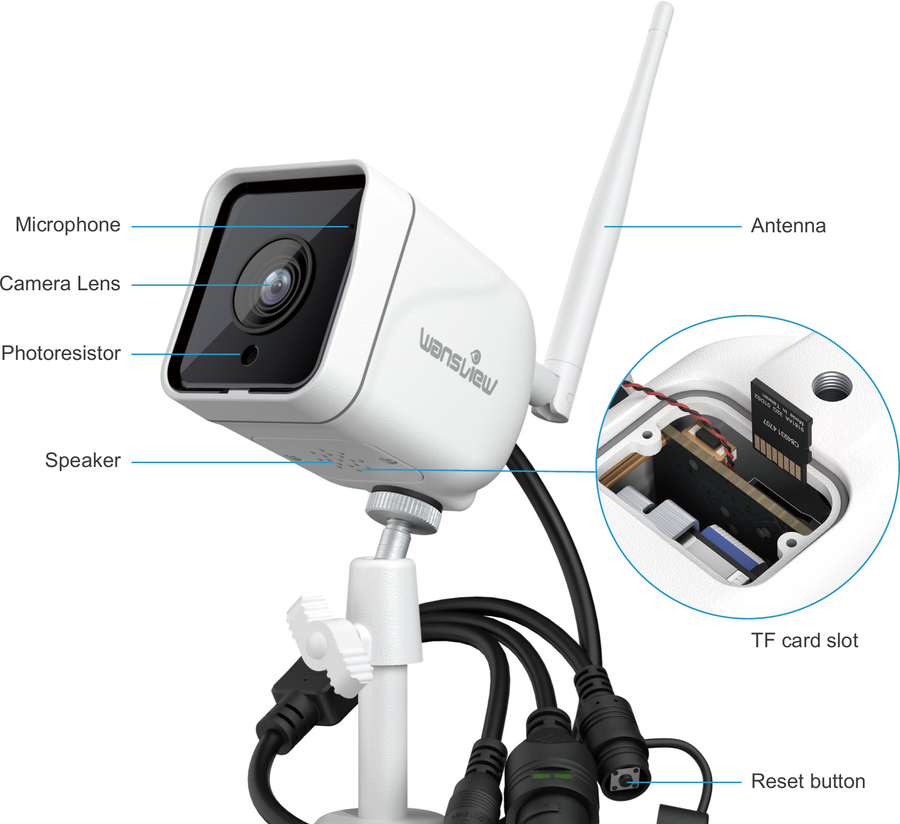
- Microphone
- Camera Lens
- Photoresistor
- Speaker
- Power port
- Antenna
- TF card slot
- Reset button
- RJ45 interface
1.1 Indicator Lights Status
| Light Status | Camera Status |
|---|---|
| Yellow light on | Camera is powered on |
| Yellow and green lights are flashing alternately | Waiting for connect now |
| Green light is flashing | Camera is connecting to WIFI |
| Green light is solid | Connect WIFI and Pair successfully |
| Yellow light is flashing quickly | Reset camera to factory setting |
Please make sure your router is connected to the Internet.
Chapter 2 — Install Wansview Cloud APP
2.1 Download app
Please download the Wansview Cloud app from the App Store / Google Play.
2.2 Account Register
Open the Wansview Cloud app and tap 【Sign up】.
Enter your email address and the password.
Your password MUST be 8-16 characters, and include at least 3 categories of the following: digits, uppercase characters, lowercase characters, special characters.
Read and agree to the Terms of Use and Privacy Policy, then tap Next.
Go to your mailbox to find a mail that includes a verification code, then enter the code to finish the sign up. If you cannot find the mail, please check the spam folder or tap Re-send mail. You can also contact us at [email protected]. You can also choose Phone number or Google account to sign in.
2.3 Sign in
When using for the first time, you need to enter the email address and password of your app account to log in. After signing in successfully, you can set a gesture login or Touch ID (Wansview Cloud app → Me page → 【Account security】 → 【Touch ID/Gesture login】).
Chapter 3 — Setup Mode
The camera can only support 2.4Ghz Wi-Fi; it doesn't support 5Ghz Wi-Fi.
3.1 Wi-Fi Setup
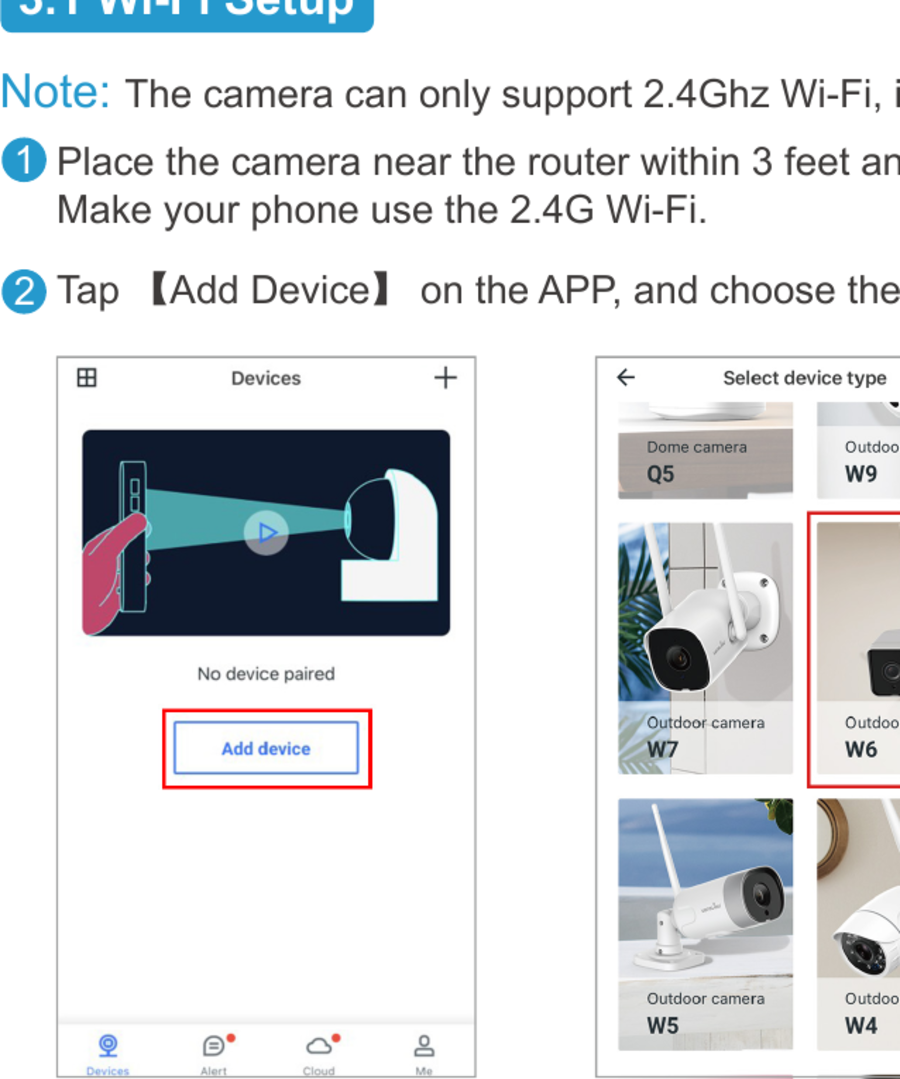
- Place the camera near the router within 3 feet and power on the camera with the attached power cord. Make your phone use the 2.4G Wi-Fi.
- Tap 【Add Device】 in the app, and choose the camera model W6.
- Select 【Wi-Fi connection by QR code】. Check if the camera's indicator light is flashing yellow and green; if yes, tap 【Flashing】.
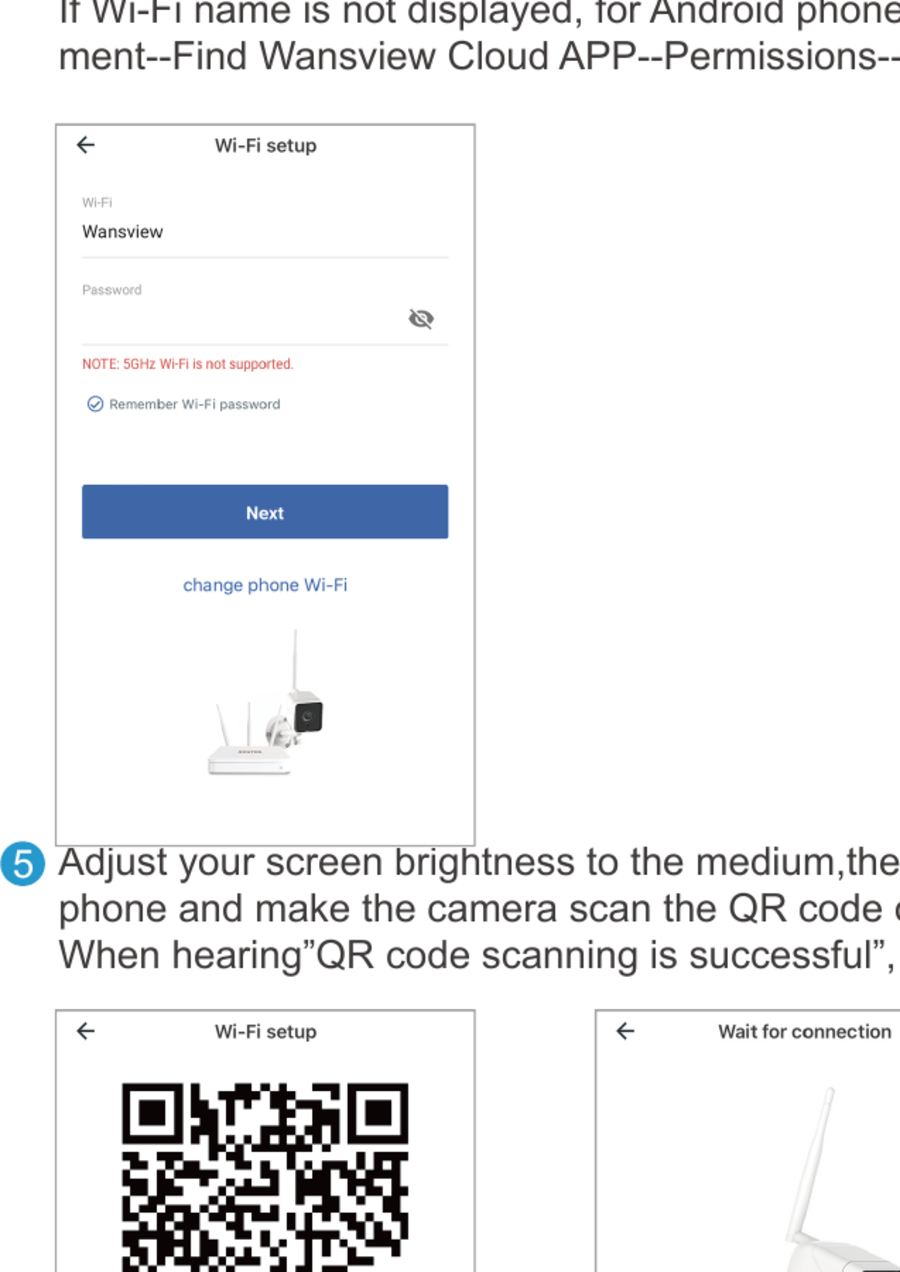
- The Wi-Fi name will be displayed automatically. Enter the correct Wi-Fi password and tap Next. If the Wi-Fi name is not displayed, for an Android phone go to Phone Setting → APP Management → find Wansview Cloud APP → Permissions → allow the app to get the location info.
- Adjust your screen brightness to medium, then place the camera lens about 3-8 inches in front of the phone and let the camera scan the QR code on the phone screen. When you hear "QR code scanning is successful", tap Next.
- Check the indicator light status. If the connection is successful, the blue light will be solid. You can rename the camera and start using it.
3.2 Wi-Fi connection by Soft-AP
- Place the camera near the router within 3 feet and power on the camera with the attached power cord. Make your phone use the 2.4G Wi-Fi.
- Tap Add Device in the app, and choose the camera model W6.
- Select 【Wi-Fi connection by Soft-AP】. Use your phone camera to scan the QR code on the camera sticker.
- Check if the camera's indicator light is flashing yellow and green. If yes, tap 【Flashing】. Tap Go to Settings, find a Wi-Fi named WVC***, and connect to it. Then go back to the Wansview Cloud app.
- The app will ask you to choose a network. Select 2.4G Wi-Fi and enter the password. The camera will start to connect with the Wi-Fi. After the camera is online, you can rename the camera and start using it.
3.3 Eth connection by cable
- Use the Ethernet cord to connect the camera with the router first, then plug the camera in via the power cable. Connect your phone to 2.4Ghz Wi-Fi. Run the Wansview Cloud app, tap +, and choose the W6 model.
- The W6 camera will be automatically recognized and searched. Tap 【Select】. If the connection is successful, the green light will be solid. You can rename the camera.
- After setting up the Ethernet cable connection successfully, if you want to switch it to Wi-Fi connection, go to the Devices page → tap 【Setting】 → tap 【Network】 → enter the Wi-Fi password. After the Wi-Fi connection is successful, you can unplug the Ethernet cable.
Chapter 4 — Live Feed
| Icon | Function |
|---|---|
| FHD | Switch the resolution from FHD to HD |
| Full screen | Tap to see full screen of the live stream |
| Audio | Tap to enable or disable audio |
| Talk | Hold to talk to the camera |
| Record | Tap to record video manually; check local records from Me → Local Video |
| Snapshot | Tap to snap a picture to phone storage; check it from 【Me】 → 【Local Photo】 |
| Multiple view | View different cameras at the same time (video streams at 480P resolution in multiple-view mode) |
Chapter 5 — Settings and Functions
5.1 Share with Family
Before sharing, please ask your family to download the Wansview Cloud app and register a new account with their own email to access the app first.
- Tap the Settings icon → 【Invite family members】, then enter the share device page. You can share the camera feed with family members; a camera can be shared with up to 3 devices at a time.
- Send the invitation link to your family's phone and ask them to open it via a browser. Tap "Receive" to accept the invitation and confirm the camera is added to the list.
The shared link is valid for 30 minutes only — please delete the record and share again if it expires. The invitee can only view the live stream, use two-way audio, and replay the alert/Cloud alarm video.
5.2 Motion Detection
Motion detection is On by default. The generated alarm video will be stored on the Alert page.
- Detection Area: Define a specific area you want your camera to detect motion in.
- Sensitivity Level: Set the sensitivity according to your preferences using the slider.
5.3 Motion Alert
Once motion is detected, you will receive a push notification in your Wansview Cloud app. Tap the message to view the 10s alarm video recorded by the camera.
- Launch the Wansview Cloud app and log in to the camera, then tap the setting icon to find the 【Motion Alert】 page.
- Enable 【motion alert】 and select the schedule to 24/7, or customize the starting and ending detection time.
You can check the short videos for the past two days for free; these alert videos can be saved to your phone and deleted. If Cloud service is subscribed, you can check the recent 7 days from the Cloud page.
5.4 RTSP Setting
Wansview cameras that support the RTSP protocol can work with third-party software like iSpy, Blueiris, and IP Cam Viewer for live viewing and recording.
- Launch the Wansview Cloud app, go to Settings → 【Local Application】 → 【Local Account】 and edit the username and password you want.
- Go to the RTSP page to set a specific port number (range 554-1554), and choose one of the live-stream URLs to copy.
- Launch iSpy → Add 【Local Camera】 → choose 【FFMPEG(H264)】 in Video Source → paste the copied URL → OK → name the camera → Success.
5.5 Camera Information
- Camera Time zone: Set the exact time zone for your camera. If you and your camera are in different time zones, the camera will send real-time alert notifications according to your setting.
- Device Information: Check the camera ID, firmware version, IP address, and Wi-Fi MAC. If there is a red dot on the Settings button, the newest firmware is available — tap the dot to update.
- Network: Check the camera's Wi-Fi name and set the camera to another Wi-Fi network, or switch from Ethernet to Wi-Fi connection.
- Device Management: Restart the camera, restore it to factory settings, or delete it. After deleting, the previous data will be reset to zero. The camera must be set up again as new if it is restored to factory settings or deleted.
- Diagnose: If your camera can't pair or the app breaks down, run the built-in diagnostics to check the problem, and provide the diagnostic report to Wansview Support.
5.6 Advanced Settings
| Setting | Description |
|---|---|
| Image rotation | Rotate the image if the camera is installed upside down |
| Auto night vision | Enable night mode to view the camera clearly in the dark |
| AC frequency | Adjust the power frequency to 50hz or 60hz |
| Camera microphone | Enable the microphone to pick up and deliver sound |
| Speaker volume | Adjust the speaker volume if the audio is too low |
| LED indicator ON/OFF | Hide the actual camera status; if enabled, the solid red light is off |
Chapter 6 — Optional Storages
6.1 Memory Card Storage
Applies to all Wansview outdoor cameras with a Micro SD card slot.
Before installing/uninstalling the SD card, power off the camera first, in case it damages the SD card. If the SD card can't be recognized, use a reader to format it to FAT32 on a PC, then insert it into the camera and try again.
Install the micro SD card:
- Unscrew the screws to open the cover and find the micro SD card slot.
- Insert the SD card face up into the slot; use your fingernail to push it until you hear a click.
- Screw the cover back on tightly.
Set up SD card recording:
- Make sure the SD card is inserted correctly.
- Tap the Settings button and set Motion Alarm and Memory Card Storage to "On".
- Select the schedule to 24/7 to allow the camera to detect motion all day.
- Tap the Replay button to see the recording on the memory card.
Playback: Tap the playback icon → tap SD card storage → choose the recording date. Use two fingers to zoom in on the timeline, press "1X" to select "2X" or "4X" to fast forward, and use the delete/save icons as needed.
Playback is only available when the SD card is inserted and recognized. The Wansview camera does not support consistent recording — it only records when it detects motion. See TF Card for compatibility.
6.2 Cloud Services
The Free Cloud Plan provides 30 days of free cloud service if you are a new Wansview user.
- SD card storage and Cloud storage work independently. If you enable both, the footage records to the Micro SD card and uploads to the cloud at the same time.
- Cloud service is not compulsory. The camera still works properly without a Cloud plan.
- Cancel the cloud service before the free trial expires if you don't want to continue, otherwise the subscription auto-renews. If you are accidentally charged, contact us via email for a refund.
- It only records the alarm video until the motion ends.
Cloud plans:
| Plan | Basic | Extended | Pro |
|---|---|---|---|
| Feature | Rolling 7-day alarm recording | Rolling 15-day alarm recording | Rolling 30-day alarm recording |
| Quantity | Max 3 Cameras | Max 5 Cameras | Max 7 Cameras |
| Price | $6.99/month · $19.99/quarter · $69.99/year | $9.99/month · $99.99/year | $16.99/month · $169.99/year |
Add the camera to a Cloud plan: Enter the Cloud page → tap + Add Camera to Plan → select the camera → tap Add to this plan → enable it and set the schedule. Tap the camera screen to view the recording; you can delete or download recordings (downloaded videos appear in Local Video on the "Me" screen).
Cancel the Cloud: Tap the Settings button on the Cloud screen, then tap "Cancel this subscription plan".
Chapter 7 — Me Page
| Item | Description |
|---|---|
| Local Video | Check the alarm video, SD card or cloud recording, and real-time recording |
| Local Image | Check the pictures of recordings or real-time images |
| Message | Check the system messages |
| Account Security | Change Face ID, Touch ID and Password |
| General Settings | Set up notifications for language, cellular usage reminders, and alarm messages |
| Contact Us | Contact us at our US email address |
| FAQ | Check out our FAQs |
| About | App version information |
| Sign Out | Log out of the account |
Chapter 8 — Alexa Compatibility
Open the Alexa app menu and look for "Skills & Games". Tap the Search icon and search for "Wansview Cloud".
Enable the Wansview Cloud feature and log in to your Wansview Cloud account. Allow the Alexa device interaction; your account will be linked with Alexa.
Go to the 【Device】 page of the Alexa app → choose 【Add Device】 → choose 【Others】. Alexa will find all cameras connected to your Wansview Cloud account.
Add the found cameras to Alexa (one at a time). After adding, tap 【Devices】 → 【All Devices】 to check all cameras. Now you can use a voice command to ask Alexa to show you the camera video at any time.
Contact Us
- US / CA: [email protected] · [email protected]
- UK: [email protected]
- Facebook: WansviewOfficial
- YouTube: WansviewOfficial
- Tel: +1-323-686-3288 (available 6 pm - 3 am PST, Monday to Friday)